
As part of my home network I have setup VPN connectivity so that I can access my stuff also when I'm not at home. Unifi Security Gateway offers PPTP and L2TP VPN servers out of the box but there are better alternatives available like WireGuard and OpenVPN. As with everything I wanted to learn new stuff so I chose Wireguard for this task. WireGuard is an extremely simple yet fast and modern VPN. WireGuard aims to be as easy to configure and deploy as SSH. A VPN connection is made simply by exchanging very simple public keys – exactly like exchanging SSH keys – and all the rest is transparently handled by WireGuard. Unfortunately the information on how to get WireGuard up & running and make the installation persistent after USG upgrades could not be found from one single place. This is why I decided to gather the data under this one post.
Installing WireGuard
- Login to your USG via ssh
- Download the latest ugw4 package from https://github.com/WireGuard/wireguard-vyatta-ubnt/releases and install it on your USG.
curl -fLSs https://github.com/WireGuard/wireguard-vyatta-ubnt/releases/download/1.0.20200729-1/ugw4-v1-v1.0.20200729-v1.0.20200513.deb /tmp/ugw4-v1-v1.0.20200729-v1.0.20200513.deb
dpkg -i /tmp/ugw4-v1-v1.0.20200729-v1.0.20200513.deb - Create private and public keys. Copy the public key somewhere as you will need that when adding a peer in your devices WireGuard settings.
cd /config/auth
umask 077
mkdir wireguard
cd wireguard
wg genkey > wg_private.key
wg pubkey < wg_private.key > wg_public.key- Copy example config.gateway.json to /srv/unifi/data/sites/default (CloudKey) or to /var/lib/unifi/data/sites/default (Raspberry Pi etc) (or the site name that you are using instead of default) on the host running the Controller. Change the YOUR-DEVICE-PUBLIC-KEY to a public key that you have generated on your device where you have WireGuard client installed. Then through the Controller Web UI navigate to Devices, click on the USG row and then in the Properties window navigate to Config > Manage Device and click Provision. Note that the mask associated with the allowed-ips is not a netmask!
{
    "firewall": {
        "group": {
            "network-group": {
                "remote_user_vpn_network": {
                    "description": "Remote User VPN subnets",
                    "network": [
                        "10.2.1.0/24"
                    ]
                }
            }
        }
    },
    "interfaces": {
        "wireguard": {
            "wg0": {
                "address": [
                    "10.2.1.1/24"
                ],
                "firewall": {
                    "in": {
                        "name": "LAN_IN"
                    },
                    "local": {
                        "name": "LAN_LOCAL"
                    },
                    "out": {
                        "name": "LAN_OUT"
                    }
                },
                "listen-port": "51820",
                "mtu": "1352",
                "peer": [{
                    "YOUR-DEVICE-PUBLIC-KEY": {
                        "allowed-ips": [
                            "10.2.1.5/32"
                        ],
                        "persistent-keepalive": 25
                    }
                }],
                "private-key": "/config/auth/wireguard/wg_private.key",
                "route-allowed-ips": "true"
            }
        }
    }
}
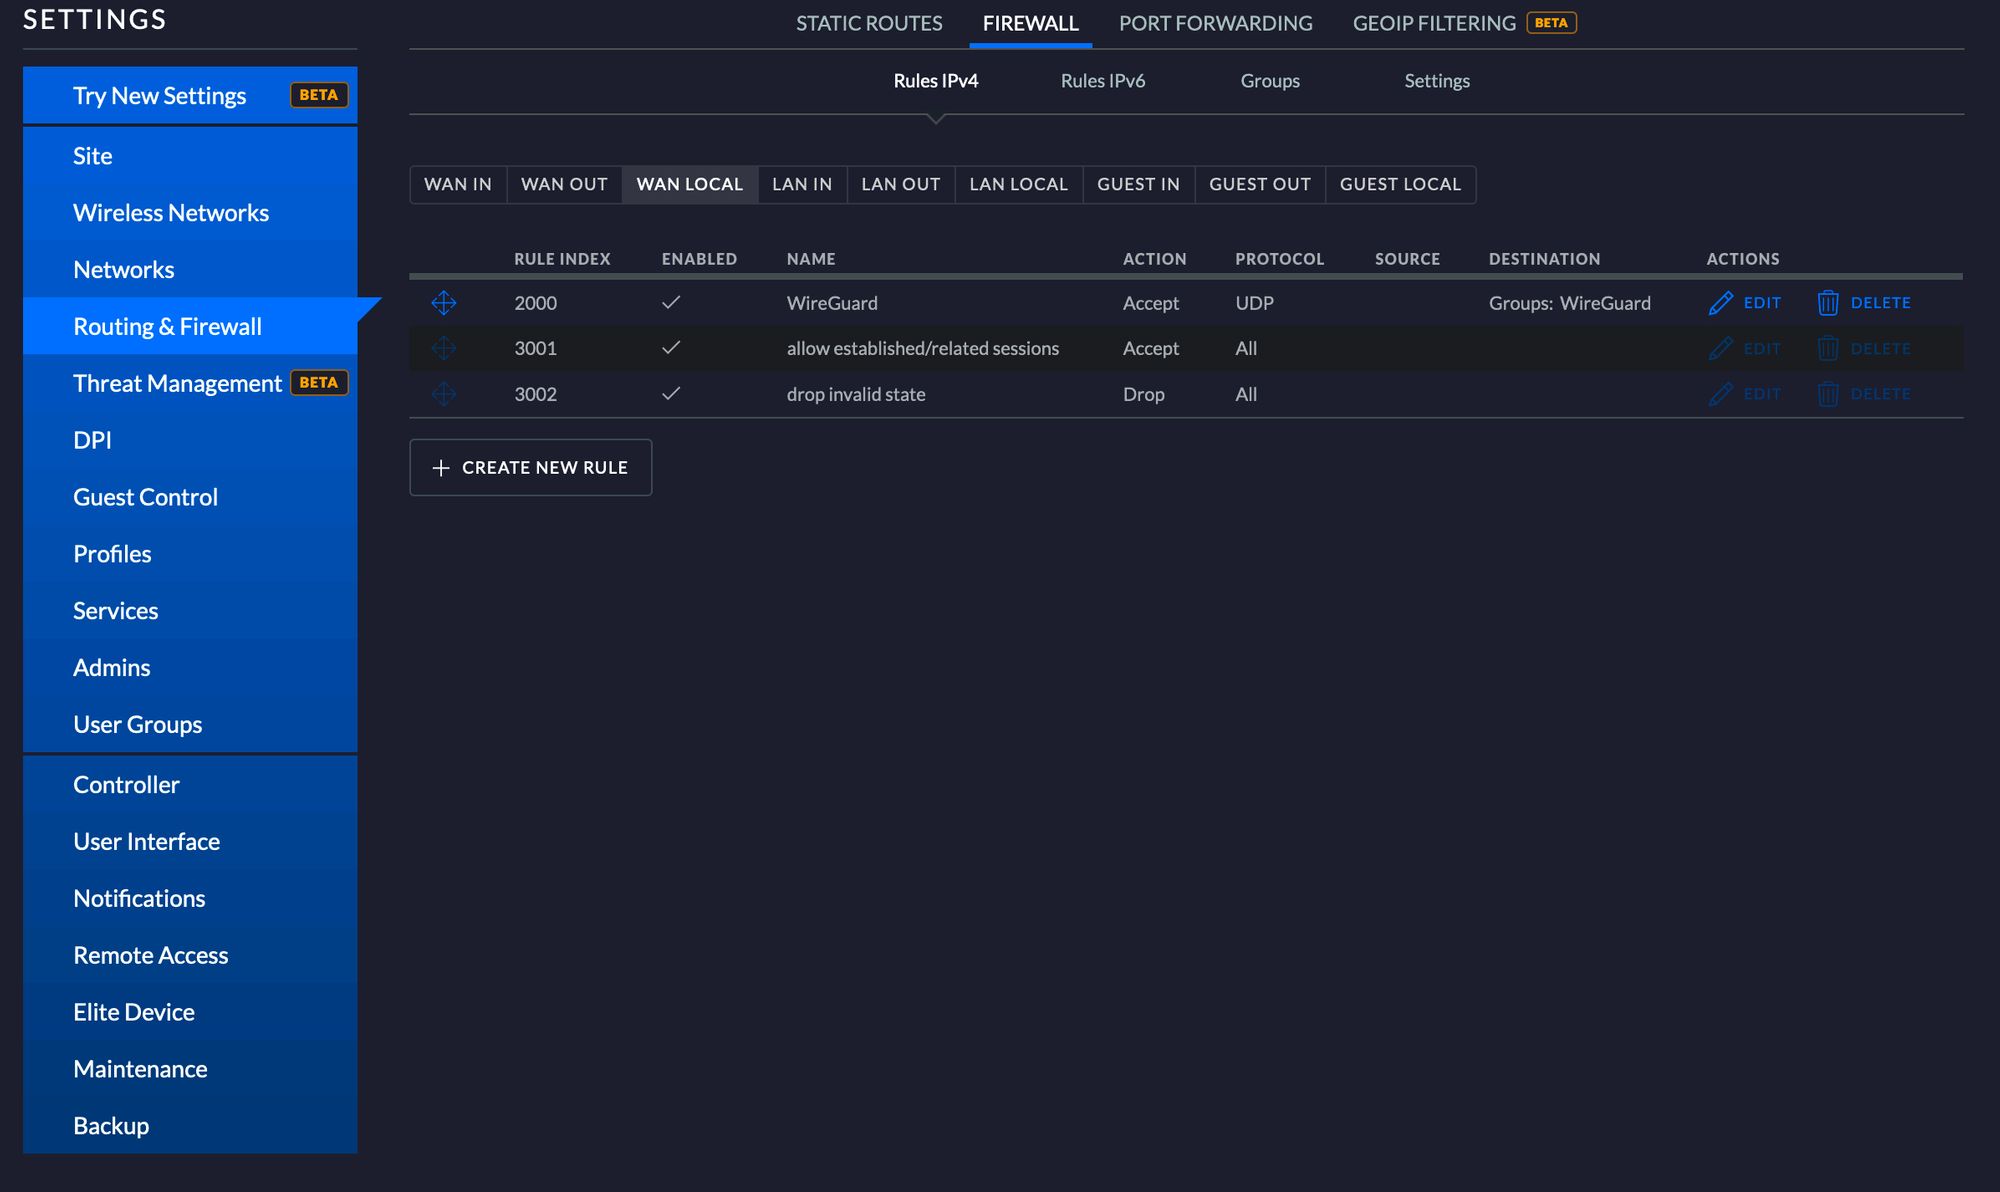
- To allow remote access navigate to Settings > Routing & Firewall > Firewall > WAN LOCAL and create a new rule to accept UDP traffic to port 51820. Note that you need to create a Port Group under Destination and add port 51820 via that. Remember to do the changes under the same site that you put the previous config file under. You can change site from the top right hand corner of the Controller UI.
- Install WireGuard on your device and configure it with the following details. With this configuration you will send all traffic via your VPN server. Full config reference can be found from https://github.com/pirate/wireguard-docs#Config-Reference.
[Interface]
PrivateKey = YOUR-DEVICES-PRIVATE-KEY
Address = 10.2.1.5/32
DNS = 1.1.1.1

[Peer]
PublicKey = YOUR-SERVERS-PUBLIC-KEY
AllowedIPs = 0.0.0.0/0
Endpoint = YOUR-SERVERS-PUBLIC-IP:51820
PersistentKeepalive = 21- You can also generate a QR code so that you can easily configure your phone to use WireGuard by running qrencode -t ansiutf8 <path_to_config_file>.
- Now you should be able to make a VPN connection with WireGuard to your USG.
Persisting changes
As we all know that all CLI made configurations and installed applications will be overwritten when you upgrade or reboot your USG. Luckily there is a way to persist these changes. Friendly guys from Helm Rock Consulting have implemented install-edgeos-packages just to solve this problem.
- Install install-edgeos-packages
curl -O https://raw.githubusercontent.com/britannic/install-edgeos-packages/master/install-pkgs
sudo install -o root -g root -m 0755 install-pkgs /config/scripts/post-config.d/install-pkgs- Add WireGuard installation package so that it will be installed after upgrade or reboot
sudo mkdir -p /config/data/install-packages
cd /config/data/install-packages
curl -fLSs https://github.com/WireGuard/wireguard-vyatta-ubnt/releases/download/1.0.20200729-1/ugw4-v1-v1.0.20200729-v1.0.20200513.deb- Export and copy config.gateway.json to /srv/unifi/data/sites/default (CloudKey) or to /var/lib/unifi/data/sites/default (Raspberry Pi etc) (or the site name that you are using instead of default) on the host running the Controller. This way the changes that you have applied via CLI will be provisioned back to the USG after reboot or upgrade. To get your config run the following via SSH on your USG.
mca-ctrl -t dump-cfg > config.gateway.jsonAfter you have done these steps you should now have fully functional WireGuard server installation which will also persist after you have rebooted or upgraded your USG.
Sources used: https://gist.github.com/pamolloy/059c552b814b0dddfcdc0cec2bbe5872 and https://britannic.github.io/install-edgeos-packages/

Comments powered by Talkyard.